练习1:超简单的涂鸦App
准备工作:安装 ADT Bundle 开发环境(我用的是v23,官方下载被墙,可从这下载)。
新建 Android 程序项目。
a. SDK 最小版本选 API 16 以上(避免自动创建的 appcompat_v7 项目出现资源缺失错误),完成后可改回低版本(使用 TouchVG 要求最低 API 12)。
b. 在创建 Activity 页面选择默认的简单布局 Blank Activity。
在主页面布局中添加一个 FrameLayout,将用作绘图区的容器。
a. 指定 ID 为 container,下面就可通过 findViewById(R.id.container)找到此布局。
b. 使用 FrameLayout 而不是其他布局类型做绘图视图容器,是避免触摸绘图引起其他相邻视图联锁刷新。
添加 TouchVG 引用。
a. 下载预编译的TouchVG包,将 touchvg.jar 和 libtouchvg.so 复制到程序项目的 libs 下。
b. 如需调试进入 TouchVG 或快速查看 IViewHelper 接口注释,则不能复制touchvg.jar,可将 TouchVG项目 复制到上级目录并导入TouchVG工程,在程序项目的 project.properties 中加入引用:android.library.reference.1=../TouchVG
在 MainActivity.java 中创建绘图视图。
a. 定义 IViewHelper 对象,在 onCreate 中创建绘图视图。
1 2 3 4 5 6 7 8 9 10 11
| public class MainActivity extends Activity { private IViewHelper mHelper = ViewFactory.createHelper(); @Override protected void onCreate(Bundle savedInstanceState) { super.onCreate(savedInstanceState); setContentView(R.layout.activity_main); mHelper.createGraphView(this, (ViewGroup) this.findViewById(R.id.container)); mHelper.setCommand("splines"); }
|
b. 在 createGraphView 下一行的 setCommand 激活随手画命令。splines 是命令名,更多命令名见在线文档。
c. 将 createGraphView 换为 createSurfaceView 可基于 SurfaceView 创建绘图视图,适合大量图形或页面上有较多控件的情况。在普通 View 上绘图时占用主线程显示,刷新时可能引起页面其他视图被动刷新。在 SurfaceView 上可异步绘图,避免连锁刷新问题。
练习2:添加绘图按钮
1 2 3 4 5 6 7 8 9 10 11 12 13 14 15 16 17 18 19
| <?xml version="1.0" encoding="utf-8"?> <LinearLayout xmlns:android="http://schemas.android.com/apk/res/android" android:layout_width="wrap_content" android:layout_height="fill_parent" android:orientation="vertical" > <ImageButton android:id="@+id/line_btn" android:layout_width="wrap_content" android:layout_height="wrap_content" android:src="@drawable/line" /> <ImageButton android:id="@+id/select_btn" android:layout_width="wrap_content" android:layout_height="wrap_content" android:src="@drawable/select" /> </LinearLayout>
|
主界面布局 activity_main.xml:
1 2 3 4 5 6 7 8 9 10 11 12 13 14 15 16 17
| <LinearLayout xmlns:android="http://schemas.android.com/apk/res/android" android:id="@+id/horzLayout" android:layout_width="match_parent" android:layout_height="match_parent" android:orientation="horizontal" > <include android:id="@+id/buttons_bar" layout="@layout/buttons_bar" /> <FrameLayout android:id="@+id/container" android:layout_width="match_parent" android:layout_height="match_parent" > </FrameLayout> </LinearLayout>
|
1 2 3 4 5 6 7 8 9 10 11 12 13 14 15 16 17 18 19 20
| @Override protected void onCreate(Bundle savedInstanceState) { ..... initButtons(); } private void initButtons() { findViewById(R.id.line_btn).setOnClickListener(new OnClickListener() { @Override public void onClick(View v) { mHelper.setCommand("line"); } }); findViewById(R.id.select_btn).setOnClickListener(new OnClickListener() { @Override public void onClick(View v) { mHelper.setCommand("select"); } }); }
|
练习3:增加自动保存和恢复功能
目前重启程序或按Home键,返回程序后所绘图形会丢失。可以增加自动保存和恢复功能。
在 AndroidManifest.xml 中增加 MOUNT_UNMOUNT_FILESYSTEMS 和 WRITE_EXTERNAL_STORAGE 权限,以读写外部存储器。
在 MainActivity 中实现 onDestroy、onPause、onSaveInstanceState、onRestoreInstanceState,分别调用 IViewHelper 中相似名称的函数。在创建绘图视图时传入 savedInstanceState,返回 Activity 时自动恢复图形:mHelper.createGraphView(this, layout, savedInstanceState);。
练习4:增加线宽动态修改和更新功能
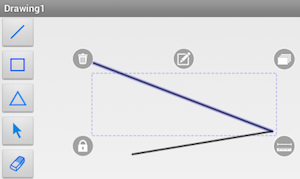
选中一个图形,可动态(所见即所得)修改其线宽等属性。没有选中图形时设置的图形属性将应用到新画的图形上。
1 2 3 4 5 6 7 8 9 10 11 12 13 14 15
| mLineWidthBar = (SeekBar) findViewById(R.id.lineWidthBar); mLineWidthBar.setOnSeekBarChangeListener(new OnSeekBarChangeListener() { @Override public void onProgressChanged(SeekBar seekBar, int progress, boolean fromUser) { mHelper.setStrokeWidth(progress); } @Override public void onStartTrackingTouch(SeekBar seekBar) { mHelper.setContextEditing(true); } @Override public void onStopTrackingTouch(SeekBar seekBar) { mHelper.setContextEditing(false); } });
|
其中,调用 setContextEditing 是避免在拖动滑块过程中多次提交改动,产生多次Undo步骤(下面会实现Undo)。
1 2 3 4 5 6
| mHelper.getGraphView().setOnSelectionChangedListener(new OnSelectionChangedListener() { @Override public void onSelectionChanged(IGraphView view) { mLineWidthBar.setProgress(mHelper.getStrokeWidth()); } });
|
练习5:增加颜色选择框
1 2 3 4 5 6 7 8 9 10 11 12
| findViewById(R.id.colorpicker_btn).setOnClickListener(new OnClickListener() { @Override public void onClick(View v) { new ColorPickerDialog(MainActivity.this, mHelper.getLineColor(), new OnColorSelectedListener() { @Override public void onColorSelected(int color) { mHelper.setLineColor(color); } }).show(); } });
|
练习6:增加Undo/Redo功能
- 在页面布局中增加两个按钮,ID为 undo_btn 和 redo_btn。
- 在按钮点击响应中执行Undo/Redo操作,并准备录制Undo信息:
1 2 3 4 5 6 7 8 9 10 11 12 13
| findViewById(R.id.undo_btn).setOnClickListener(new OnClickListener() { @Override public void onClick(View v) { mHelper.undo(); } }); findViewById(R.id.redo_btn).setOnClickListener(new OnClickListener() { @Override public void onClick(View v) { mHelper.redo(); } }); mHelper.startUndoRecord(PATH + "undo");
|
- 增加图形内容改变的观察者,在图形改变时更新按钮状态:
1 2 3 4 5 6 7
| mHelper.getGraphView().setOnContentChangedListener(new OnContentChangedListener() { @Override public void onContentChanged(IGraphView view) { findViewById(R.id.undo_btn).setEnabled(mHelper.canUndo()); findViewById(R.id.redo_btn).setEnabled(mHelper.canRedo()); } });
|
所有源码已在GitHub开放,欢迎试验评论。
